The CurveCorrect ingrown toenail brace is a thin, reinforced composite strip you fasten to the surface of your toenail. The ingrown toenail brace acts like a spring, gently straightening and lifting each side of the toenail, reducing its pressure against the skin. Correction is painless and occurs over a period of weeks.
Applying CurveCorrect requires precision so if you have difficulty reaching your feet, ask someone for help. The following guide will help you or someone else along.
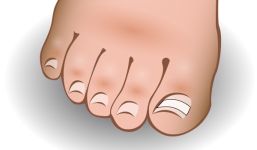
A brace that corrects the toenail too quickly will cause pain. Toenails two through five, fingernails, children's toenails and thin toenails require less force to correct, thus a brace with less tension is necessary to prevent injury. We offer a variety of braces for different applications. Some mild discomfort or pulling sensation may be normal for the first few days but if you experience pain or bruising, remove the brace immediately.
Preparing Your Toenail
Trim your toenail if necessary. Follow correct trimming techniques by never rounding the corners of your toenail, this is a common cause of ingrown toenails. Your toenail must be completely clean and free of contaminants like nail polish, ointment, bandage adhesive, sock fibers, pus, blood, etc. Clean the entire toenail including the ingrown area with soap and water. Use a fine brush to reach into the nail fold where contaminants collect. Read through Steps 1-9 completely before beginning the application so you’re prepared for each step.
What You Need
- The CurveCorrect ingrown toenail bracing kit.
- Sharp scissors or toenail clipper (to cut the toenail brace to the correct length).
- A paper towel or tissue (to clean up excess adhesive if necessary).
- A place to sit that allows you or someone else to comfortably reach the toe(s).
Positioning the Toenail Brace
Ideal Placement: If your nail is evenly curved across its surface the brace should be centered on the nail and span as much of your nail as possible. Each end of the brace prefers a relatively flat surface for bonding. Let the shape of your nail determine the best placement. If your nail is deeply embedded on either side don’t try to apply the brace between your skin and the nail. Apply the brace only to exposed part of your nail. As your nail undergoes correction you’ll be able to increase the coverage of the brace with each new application.
Alternate Placement: If your nail is more highly curved or sharply curved in one particular area, alter the position of the brace as described below.
- Reduce the coverage of the brace, making it shorter to avoid a sharply curved portion of your nail during the initial applications. This is common at one or both sides.
- Position the brace forward or backward where your toenail is less curved or more evenly curved.
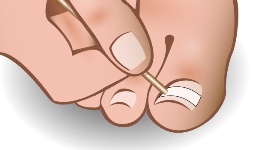
Step 1: Pre-Fit Brace
There are two steps in bonding the toenail brace: bonding the first end, then the second end. Position the first end on the side of the toenail most affected. This end of the toenail brace is required to lay flat against the toenail during this step. The angle of the brace will vary depending on the curve on this side of your toenail. Take note of this angle.
Step 2: Roughen toenail
To aid adhesion file the surface of your toenail all the way to its edge on both sides. Pay particular attention to where the toenail brace will be applied. Remove ridges and high spots to minimize gaps underneath the brace.
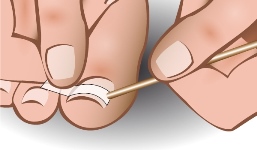
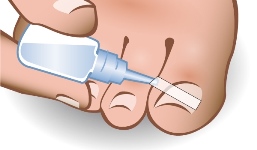
Step 3: Clean with Solvent
Dip a cotton swab into the solvent and wipe the entire surface of your toenail. Try to get deep into the nail groove where the brace will be applied. Allow to dry.
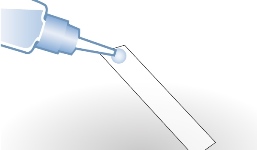
Step 4: Apply Adhesive to First End
Apply a small puddle of adhesive to one end of the ingrown toenail brace. The diameter of the adhesive puddle should be as wide as the brace and as deep as the thickness of the brace. Do not apply adhesive to the toenail. Be careful not to let the adhesive touch any other part of your body, it will bond immediately.

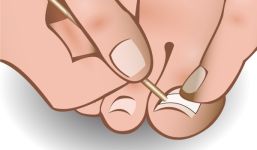
Step 5: Bond First End
Curing begins quickly so you must get the placement right immediately upon contact with your toenail. Position the first end of the toenail brace (adhesive end) where you pre-fit it in step 1 using the opposite end of a cotton swab. Hold the brace motionless for 30 seconds. Release and allow the adhesive to continue curing for 2 minutes.
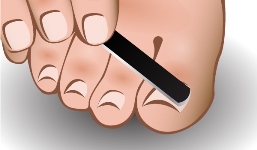
Step 6: Ensure Correct Length
Bend the second end of the toenail brace to the opposite side of your toenail to find its correct length. Ideally it should reach all the way to the toenails edge. Carefully trim it to length with scissors while being careful not to stress the bond.
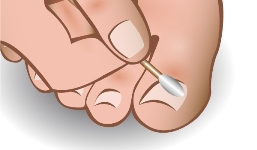
Step 7: Apply Adhesive to Second End
Apply adhesive underneath the second end of the ingrown toenail brace the same way you did the first end.
Step 8: Bond Second End
With one hand, press the ingrown toenail brace down against the top of the toenail to ensure there are no gaps underneath it. With the other hand and the opposite end of a cotton swab press the second end against your toenail and hold it motionless for 1 minute. Release.
Step 9: Finish
File any sharp edges that might snag your clothing. Make sure the ends of the brace do not extend beyond the sides of your toenail, this will cause pain. File down the ends of the brace if this occurs. Shoes and socks can be worn immediately.